Прескочи на основното съдържание

Как да копирате среща в друг ден в календара на Outlook?

Автор: Кели Последна промяна: 2020-05-25

В календара на Outlook се опитах да копирам среща за друг ден чрез копиране и поставяне. Само темата на срещата обаче беше копирана, както е показано на екранната снимка по-долу. Но трябва да копирам цялата среща с изключение на началната/крайната й дата, някакви идеи?


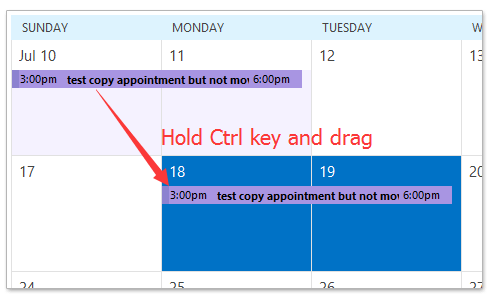
Копирайте среща в друг ден в календара на Outlook с клавиша Ctrl

в календар изглед на Outlook, изберете срещата, която ще копирате, плъзнете я към друг ден, като задържите Ctrl и след това отпуснете мишката.

И сега избраната среща се копира точно в друг ден, с изключение на началната и крайната дата. Вижте екранна снимка:


Копирайте среща в друг ден в календара на Outlook с десния бутон на мишката

в календар изглед на Outlook, плъзнете срещата, като задържите десния бутон на мишката, отпуснете мишката до определения ден, в който ще копирате, и след това изберете Копирайте от изскачащото контекстно меню. Вижте екранна снимка:

И сега срещата се копира в посочения ден в календара в Outlook. Вижте екранна снимка:

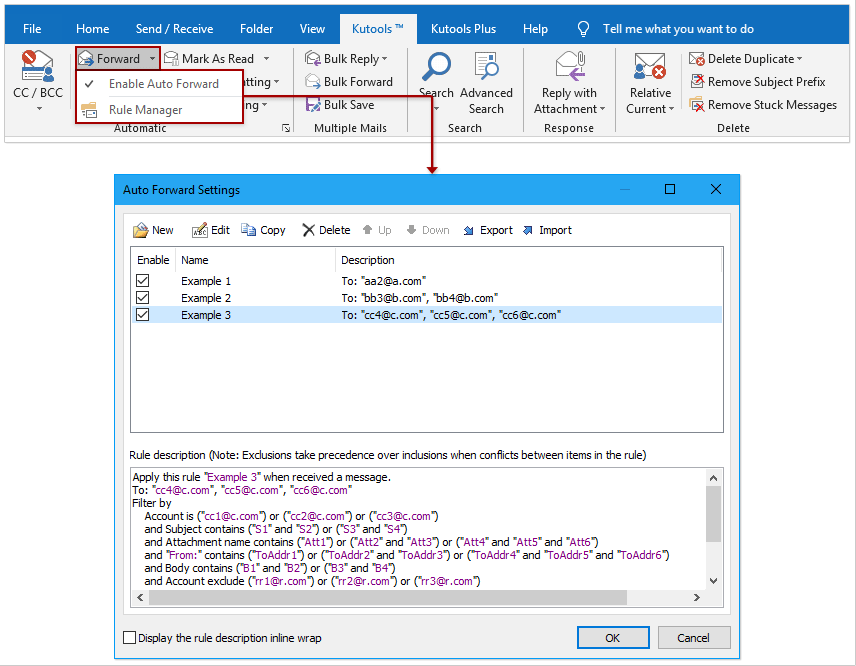
Автоматично препращайте всеки имейл до посочения получател в Outlook

Най-общо казано, можем да зададем правило за автоматично препращане на имейли до определени получатели, като например вашия друг имейл акаунт, вашия Gmail или вашите колеги и т.н. Но всичко, което знаем, ще отнеме много време, за да конфигурирате персонализирано правило в Outlook. Сега представяме Kutools за Outlook (Автоматично) напред функция, която може да зададе правило за автоматично пренасочване само с няколко кликвания.


автоматично препращане на имейли

Свързани статии


Най-добрите инструменти за продуктивност в офиса

Kutools за Outlook - Над 100 мощни функции, за да заредите вашия Outlook

🤖 AI Mail Assistant: Незабавни професионални имейли с AI магия - с едно щракване до гениални отговори, перфектен тон, многоезично владеене. Трансформирайте имейла без усилие! ...

📧 Автоматизиране на имейли: Извън офиса (налично за POP и IMAP)  /  График за изпращане на имейли  /  Автоматично CC/BCC по правила при изпращане на имейл  /  Автоматично пренасочване (разширени правила)   /  Автоматично добавяне на поздрав   /  Автоматично разделяне на имейлите с множество получатели на отделни съобщения ...

📨 Управление на Email: Лесно извикване на имейли  /  Блокиране на измамни имейли по теми и други  /  Изтриване на дублирани имейли  /  подробно търсене  /  Консолидиране на папки ...

📁 Прикачени файлове ProПакетно запазване  /  Партидно отделяне  /  Партиден компрес  /  Автоматично запазване   /  Автоматично отделяне  /  Автоматично компресиране ...

🌟 Магия на интерфейса: 😊 Още красиви и готини емотикони   /  Увеличете продуктивността на Outlook с изгледи с раздели  /  Минимизирайте Outlook, вместо да затваряте ...

???? Чудеса с едно кликване: Отговорете на всички с входящи прикачени файлове  /   Антифишинг имейли  /  🕘Показване на часовата зона на подателя ...

👩🏼‍🤝‍👩🏻 Контакти и календар: Групово добавяне на контакти от избрани имейли  /  Разделете група контакти на отделни групи  /  Премахнете напомнянията за рожден ден ...

Над 100 Характеристики Очаквайте вашето проучване! Щракнете тук, за да откриете повече.


Comments (12)
Rated 5 out of 5 · 1 ratings
This comment was minimized by the moderator on the site
Muito obrigado! Funciona e é simples e rápido de fazer. A explicação com as imagens ajudou muito.
Rated 5 out of 5
This comment was minimized by the moderator on the site
I was able to follow Bethanne's comments and was successful after cursing MS on this for months. THANKS! "Find your folders pane. Mine is on the left of the screen and shows just two months over the list of folders. One can resize the folders pane to reveal more months. There's a border between the folders pane and the main calendar view. Hover over that border and your cursor arrow changes to the column resize icon. Now drag the border over to make the folders pane bigger and the main view smaller. More months will appear in the folders pane." Then, follow the suggestion to hold CTRL to copy while dragging the appointment you want to duplicate to the new callendar location, and DROP it.
This comment was minimized by the moderator on the site
On the left side of your screen should be a folder pane. Open and pin it to stay open, if it is not already. Click on the date of the appointment/meeting you want to copy. Then find the date in the control pane you want to copy the appointment/meeting to. Hold the ctrl button while clicking on the date(s) you want to copy to. All chosen date should appear on your screen. Then you can use the drag and drop with right click on the mouse, or hold ctrl while drag & dropping to the next date(s).
This comment was minimized by the moderator on the site
On my machine, any of the copy-paste methods (inc. ctrl+c, ctrl+v) do not copy the reminder - the one thing that definitely should be copied!
This comment was minimized by the moderator on the site
Thank you, thank you, thank you for posting this!
This comment was minimized by the moderator on the site
On a Macintosh computer, you hold down the Option key, then click and drag the item to a different day.
This comment was minimized by the moderator on the site
Copying the appointment by dragging doesn't work if the target date is not visible on the screen. The calendar does not scroll while you are dragging the appointment.
This comment was minimized by the moderator on the site
Hi,
Here is a workaround may help you.
Drag to copy the appointment to any one date close to the target appointment, and then modify the start date and end date of the new appointment.
Hope it helpful!
This comment was minimized by the moderator on the site
Agree, this is what I am trying to do as well. Anyone found a solution?
This comment was minimized by the moderator on the site
Did you find an answer for this, Guy? I need to know the very same thing.
This comment was minimized by the moderator on the site
Sandra's got the right answer, but I'll be more specific: Find your folders pane. Mine on the left of the screen and shows just two months over the list of folders. One can resize the folders pane to reveal more months. There's a border between the folders pane and the main calendar view. Hover over that border and your cursor arrow changes to the column resize icon. Now drag the border over to make the folders pane bigger and the main view smaller. More months will appear in the folders pane. It drove me absolutely crazy until I figured this out.
This comment was minimized by the moderator on the site
where you can view multiple months on the side or wherever you position them, you can view more than a year's worth if you click and drag the dragger* (sorry i don't know the correct term) you can then right-click your calendar invite, drag & drop it onto any day you choose
There are no comments posted here yet
Please leave your comments in English
Posting as Guest
×
Rate this post:
0   Characters
Suggested Locations