Прескочи на основното съдържание

Как да експортирате всички изображения наведнъж от Excel?

Автор: Xiaoyang Последна промяна: 2022-03-11

Да предположим, че имате много снимки в работната си книга и искате да ги запишете в определена папка наведнъж, обикновено можете да копирате и поставите картините една по една ръчно за запазване, но копирането и поставянето им отнема много време многократно като това. Тук ще ви представя някои съвети за решаване на тази задача.


Експортирайте всички изображения наведнъж от Excel с функцията Save As

С вграден Excel Save As функция, можете да запишете работна книга като Уеб страница за да запазите всички картини, включително диаграми, форми и други обекти в папка. Моля, направете следното.

1. Отворете работната книга с картинките, които искате да запазите. Кликнете досие > Save As > Преглед.

2. В Save As диалогов прозорец, трябва да:

2.1) Изберете папка за запазване на експортираните изображения;
2.2) Изберете Уеб страница от падащия списък Запиши като тип;
2.3) Щракнете върху Save бутон.

3. При изскачане Microsoft Excel кликнете върху Да бутон.

4. Отворете папката, в която са записани експортираните файлове, и можете да видите папка и файл във формат HTML, изброени вътре. Всички картини в работната книга, включително диаграми, фигури или обекти, се записват в тази папка.

5. Можете да запазите нужните ви снимки в папката и да изтриете други, които не ви трябват


Лесно експортирайте всички изображения наведнъж от Excel с невероятен инструмент

Горният метод ще извлече всички обекти от работната книга, може би някои от тях не ви трябват. Ако имате Kutools за Excel инсталиран в Excel, неговият Експортиране на графики функцията може да ви помогне да запазите само снимките, от които се нуждаете.

След инсталиране Kutools за Excel, моля, направете следното:

1. кликване Kutools плюс > Внос износ > Експортиране на графики:

2. В Експортиране на графики диалогов прозорец, моля, конфигурирайте както следва:

2.1) Изберете Снимки от Видове падащ списък;
Съвет: По подразбиране всички графики, включително диаграми, картини и форми в текущата работна книга, са изброени.
2.2) В Запазване на директория , кликнете върху бутон за избор на папка за запазване на вашите експортирани снимки;
2.3) В Формат за експортиране падащ списък, изберете типа изображение, като което искате да експортирате;
2.4) Щракнете OK.

3. След това се появява диалогов прозорец, за да ви каже колко снимки са били успешно експортирани, щракнете върху OK бутон.

Сега можете да отидете в целевата папка и да проверите експортираните изображения.

Моля, кликнете Експортиране на графики за да научите повече за тази функция.

Преди да кандидатствате Kutools за Excel, Моля те първо го изтеглете и инсталирайте.


Експортирайте изображения и ги преименувайте със стойностите на съседните клетки

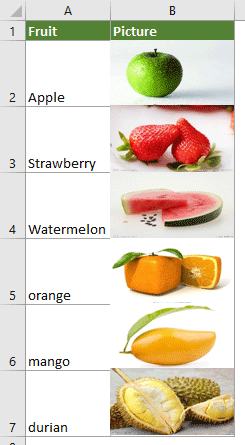
Както е показано на екранната снимка по-долу, има две колони, едната съдържа списък с имена на плодове, а другата съдържа съответните снимки на плодовете. За да експортирате тези изображения и автоматично да ги наименувате със съответните имена на плодове, можете да опитате кода VBA в този раздел.

1. В работния лист, където искате да експортирате снимките, натиснете Друг + F11 за да отворите Microsoft Visual Basic за приложения прозорец.

2. В Microsoft Visual Basic за приложения прозорец, кликнете Поставете > Модул. След това копирайте следния VBA в прозореца на модула.

VBA код: Експортирайте снимки в колона и ги наименувайте автоматично

Sub ExportImages_ExtendOffice()
'Updated by Extendoffice 20220308
    Dim xStrPath As String
    Dim xStrImgName As String
    Dim xImg As Shape
    Dim xObjChar As ChartObject
    Dim xFD As FileDialog
    Set xFD = Application.FileDialog(msoFileDialogFolderPicker)
    xFD.Title = "Please select a folder to save the pictures" & " - ExtendOffice"
    If xFD.Show = -1 Then
       xStrPath = xFD.SelectedItems.Item(1) & "\"
    Else
        Exit Sub
    End If
    
    On Error Resume Next
    For Each xImg In ActiveSheet.Shapes
        If xImg.TopLeftCell.Column = 2 Then
        xStrImgName = xImg.TopLeftCell.Offset(0, -1).Value
        If xStrImgName <> "" Then
            xImg.Select
            
            Selection.Copy
            Set xObjChar = ActiveSheet.ChartObjects.Add(0, 0, xImg.Width, xImg.Height)
            With xObjChar
                .Border.LineStyle = xlLineStyleNone
                .Activate
                ActiveChart.Paste
                .Chart.Export xStrPath & xStrImgName & ".png"
                .Delete
            End With
        End If
        End If
    Next
End Sub

Забележки:

1) Числото 2 в реда „Ако xImg.TopLeftCell.Column = 2 Тогава” представлява номера на колоната, от която искате да експортирате снимките;
2) Числото -1 в реда „xStrImgName = xImg.TopLeftCell.Offset(0, -1).Стойност” показва, че ще именувате картините със стойностите на съседните леви клетки.

3. Натисни F5 ключ за изпълнение на кода. В отварящия се прозорец изберете папка за запазване на снимките и след това щракнете OK.

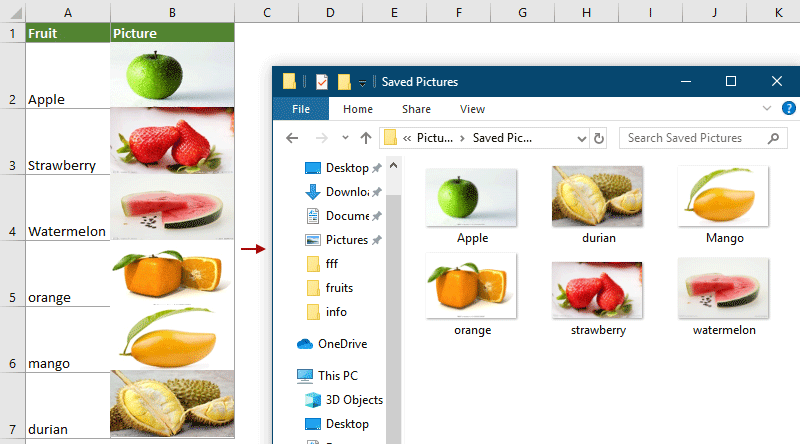
След това всички снимки в определена колона се експортират и автоматично се наименуват със стойностите на съседните клетки, както сте посочили.


Свързана статия:

Как да експортирате диаграми в графики в Excel?

Най-добрите инструменти за продуктивност в офиса

🤖 Kutools AI помощник: Революционизирайте анализа на данни въз основа на: Интелигентно изпълнение   |  Генериране на код  |  Създаване на персонализирани формули  |  Анализирайте данни и генерирайте диаграми  |  Извикване на функциите на Kutools...
Популярни функции: Намерете, маркирайте или идентифицирайте дубликати   |  Изтриване на празни редове   |  Комбинирайте колони или клетки без загуба на данни   |   Кръг без формула ...
Супер търсене: VLookup с множество критерии    VLookup с множество стойности  |   VLookup в няколко листа   |   Размито търсене ....
Разширен падащ списък: Бързо създаване на падащ списък   |  Зависим падащ списък   |  Падащ списък с множество избори ....
Мениджър на колони: Добавете конкретен брой колони  |  Преместване на колони  |  Превключване на състоянието на видимост на скритите колони  |  Сравнете диапазони и колони ...
Препоръчани функции: Мрежов фокус   |  Изглед на дизайна   |   Голям формула бар    Мениджър на работни книги и листове   |  Библиотека с ресурси (Автоматичен текст)   |  Избор на дата   |  Комбинирайте работни листове   |  Шифроване/декриптиране на клетки    Изпращайте имейли по списък   |  Супер филтър   |   Специален филтър (филтър получер/курсив/зачертано...) ...
Топ 15 комплекта инструменти12 Текст Инструменти (добавяне на текст, Премахване на символи, ...)   |   50 + Графика Видове (диаграма на Гант, ...)   |   40+ Практичен формули (Изчислете възрастта въз основа на рождения ден, ...)   |   19 вмъкване Инструменти (Въведете QR код, Вмъкване на картина от пътя, ...)   |   12 Конверсия Инструменти (Числа към думи, Валутен обмен, ...)   |   7 Обединяване и разделяне Инструменти (Разширено комбиниране на редове, Разделени клетки, ...)   |   ... и още

Усъвършенствайте уменията си за Excel с Kutools за Excel и изпитайте ефективност, както никога досега. Kutools за Excel предлага над 300 разширени функции за повишаване на производителността и спестяване на време.  Щракнете тук, за да получите функцията, от която се нуждаете най-много...

Описание


Раздел Office Внася интерфейс с раздели в Office и прави работата ви много по-лесна

  • Разрешете редактиране и четене с раздели в Word, Excel, PowerPoint, Publisher, Access, Visio и Project.
  • Отваряйте и създавайте множество документи в нови раздели на един и същ прозорец, а не в нови прозорци.
  • Увеличава вашата производителност с 50% и намалява стотици кликвания на мишката за вас всеки ден!
Comments (24)
Rated 5 out of 5 · 1 ratings
This comment was minimized by the moderator on the site
WaW Amazing ! Thanks a lot ! It works perfect for me !
I couldn't insert Milan's code inside the first one, so maybe you could update with the two codes combined ?
It is because my pictures are so small...
Rated 5 out of 5
This comment was minimized by the moderator on the site
Thank you! The code does the job. The only downside is it exports images in displayed size, not in original size. And it's often the case, when an otherwise large image is scaled down to fit in the cell. Is there a way to tweak this code to export original size images?

Sub ExportImages_ExtendOffice()
'Updated by Extendoffice 20220308
    Dim xStrPath As String
    Dim xStrImgName As String
    Dim xImg As Shape
    Dim xObjChar As ChartObject
    Dim xFD As FileDialog
    Set xFD = Application.FileDialog(msoFileDialogFolderPicker)
    xFD.Title = "Please select a folder to save the pictures" & " - ExtendOffice"
    If xFD.Show = -1 Then
       xStrPath = xFD.SelectedItems.Item(1) & "\"
    Else
        Exit Sub
    End If
    
    On Error Resume Next
    For Each xImg In ActiveSheet.Shapes
        If xImg.TopLeftCell.Column = 2 Then
        xStrImgName = xImg.TopLeftCell.Offset(0, -1).Value
        If xStrImgName <> "" Then
            xImg.Select
            
            Selection.Copy
            Set xObjChar = ActiveSheet.ChartObjects.Add(0, 0, xImg.Width, xImg.Height)
            With xObjChar
                .Border.LineStyle = xlLineStyleNone
                .Activate
                ActiveChart.Paste
                .Chart.Export xStrPath & xStrImgName & ".png"
                .Delete
            End With
        End If
        End If
    Next
End Sub
This comment was minimized by the moderator on the site
same issue...
just a quick edit:
If xStrImgName <> "" Then
            xImg.Select
          [b]  xImg.ScaleHeight 1#, True, msoScaleFromTopLeft
            xImg.ScaleWidth 1#, True, msoScaleFromTopLeft[/b]


this will resize all images, so you have to close the file afterwards without saving to preserve the initial vie, but the pictures will go out in their original size.
This comment was minimized by the moderator on the site
fixed, thank you anyway:

Sub ExportImages_ExtendOffice()
'Updated by Extendoffice 20220308
    Dim xStrPath As String
    Dim xStrImgName As String
    Dim xImg As Shape
    Dim xObjChar As ChartObject
    Dim xFD As FileDialog
    Set xFD = Application.FileDialog(msoFileDialogFolderPicker)
    xFD.Title = "Please select a folder to save the pictures" & " - ExtendOffice"
    If xFD.Show = -1 Then
       xStrPath = xFD.SelectedItems.Item(1) & "\"
    Else
        Exit Sub
    End If
    
    On Error Resume Next
    For Each xImg In ActiveSheet.Shapes
        If xImg.TopLeftCell.Column = 2 Then
        xStrImgName = xImg.TopLeftCell.Offset(0, -1).Value
        If xStrImgName <> "" Then
            xImg.Select
'            Selection.Copy
            Selection.CopyPicture Appearance:=xlScreen, Format:=xlPicture
            Set xObjChar = ActiveSheet.ChartObjects.Add(0, 0, xImg.Width, xImg.Height)
            With xObjChar
                .Parent.ShapeRange.Line.Visible = msoFalse
                .Border.LineStyle = xlLineStyleNone
'                .Activate
                .Select
                ActiveChart.Paste
                .Chart.Export xStrPath & xStrImgName & ".png"
                .Delete
            End With
        End If
        End If
    Next
End Sub
This comment was minimized by the moderator on the site
Thank you for this great tool, It saved me a ton of time. But I've ran into an issue that most of the photos are saved as blank photos as shown in the attached screenshot. Appreciate the help. Thank you
This comment was minimized by the moderator on the site
Hello, Mohamed
Did your problem occur when using Kutools for Excel? If so, could you upload your workbook file here if you don't mind?
So that, we can check where the problem is?
Thank you!
This comment was minimized by the moderator on the site
I am using the code given in the " Export images and rename them with the adjacent cell values" part of the article. When I run this code I get the following error: "Run-time error '91': Object variable or With block variable not set."

When I click "debug" it points me to line 9 of the code :
xFD.Title = "Please select a folder to save the pictures" & " - ExtendOffice"

Do you have a solution to this? Your article is the only solution I can find.

I am using Excel for Mac.
This comment was minimized by the moderator on the site
Hello, Dylan,

Sorry, our code is only applicable to Microsoft Excel, maybe you can try the code in Microsoft Excel.
Thank you!
This comment was minimized by the moderator on the site
I am using Microsoft Excel on Mac OSX.
This comment was minimized by the moderator on the site
I am also getting this issue using a Mac - Dylan were you able to resolve?

Are we meant to change something with the below that it is picking up as a bug?

xFD.Title = "Please select a folder to save the pictures" & " - ExtendOffice"
This comment was minimized by the moderator on the site
Hello, thank you for this article. When I execute the code above from Export images and rename them with the adjacent cell values, I get the following error message: Run-time error '91': Object variable or With block variable not set. When I click debug, it highlights line 9 of the code. Do you know why this is happening? FYI I am using Excel for Mac OSX. Thank you
This comment was minimized by the moderator on the site
Τέλειο εργαλείο! Όμως το μέγεθος-ανάλυση της εικόνας μικραίνει . Υπάρχει τρόπος να διατηρηθεί η αρχική ανάλυση ?
This comment was minimized by the moderator on the site
Bonjour le code VBA m'enregistre des images blanches je ne comprends pas pourquoi. quelqu'un a une solution ?
This comment was minimized by the moderator on the site
Hello, Sophie,
The code in this article can work well in my Excel, could you upload your Excel file here if you don't mind? So we can help to check the problem for you.
Or you can describe your problem more clear and detailed.
Thank you!
This comment was minimized by the moderator on the site
hallo skyyang, ich habe seit neulich das gleiche problem, viele leere *.png dateien.
Your text to link
bei jedem exportversuch werden andere bilder nicht richtig erfasst.
mfg und danke
This comment was minimized by the moderator on the site
Hello, milan bojic
Which Excel version do you use?
I have tried the code in your workbook, it works well, and all the images in your workbook are exported in the folder and renamed based on the cell value, see screenshot:
https://www.extendoffice.com/images/stories/comments/comment-skyyang/doc-export-images-1.png
This comment was minimized by the moderator on the site
Hello skyyang, it's office 365. your code was working fine until 2 weeks ago, not anymore, see screenshot. meanwhile i found something similar that works, (combined with yours), maybe you can use that for your code.

screenshot:
[img]https://drive.google.com/file/d/1vfRlhpyzqg7QNFeYl53mTvNON3gIrFwv/view?usp=sharing[/img]


Sub BilderExportieren()
    Dim shaBild As Shape
    Dim strZielpfad As String
    strZielpfad = "c:\Tuerliste\img3\" '<== Zielpfad entsprechend anpassen!!
    For Each shaBild In ActiveSheet.Shapes
        BildExportShape shaBild, strZielpfad
    Next shaBild
End Sub

Sub BildExportShape(shaBild As Shape, strZiel As String)
    Dim xStrImgName As String
    Dim chDiagramm As ChartObject
    xStrImgName = shaBild.TopLeftCell.Offset(0, -1).Value
    Application.ScreenUpdating = False
    shaBild.CopyPicture Appearance:=xlScreen, Format:=xlPicture
    Set chDiagramm = ActiveSheet.ChartObjects.Add(0, 0, shaBild.Width, shaBild.Height)
    With chDiagramm.Chart
        ' erforderlich bei Excel2010, da Diagrammfläche automatisch mit Rahmen erstellt wird
        .Parent.ShapeRange.Line.Visible = msoFalse
        ' bei Excel2016 muss die Diagrammfläche selektiert vor .Paste werden - andernfalls ist das Bild leer
        If Val(Application.Version) = 16 Then .ChartArea.Select
        .Paste
        .Export Filename:=strZiel & xStrImgName & ".png", FilterName:="png"
    End With
    chDiagramm.Delete
    Set chDiagramm = Nothing
    Set shaBild = Nothing
    Application.ScreenUpdating = True
End Sub


Thank you anyway
Milan Bojic
This comment was minimized by the moderator on the site
Hello, milan bojic,
Thanks for your code, maybe it can help others in the future. 🙂
This comment was minimized by the moderator on the site
This is great, if I wanted to grab the background colour of a cell (instead of an image) and save that as a image named with the adjacent cell how would that be an easy change to the code?
This comment was minimized by the moderator on the site
Hi Tom,Do you mean saving the background color of the cell as an image and named it with the adjacent cell value?Sorry can't help you with that.
This comment was minimized by the moderator on the site
thanks a lot it helped me a lot
There are no comments posted here yet
Load More
Please leave your comments in English
Posting as Guest
×
Rate this post:
0   Characters
Suggested Locations