Как да създадете месечен/годишен календар в Excel?
След известно време трябва да създадете конкретен календар за месец или година в Excel, как можете бързо да го разрешите? Този урок представя триковете за бързо създаване на месечен или годишен календар в Excel.
Създайте месечен или годишен календар чрез шаблон на Excel
Създайте месечен календар от VBA
Създавайте лесно месечен или годишен календар чрез Perpetual Calendar ![]()
 Създайте месечен или годишен календар чрез шаблон на Excel

В Excel можете да използвате шаблон на календар, за да създадете месечен или годишен календар.
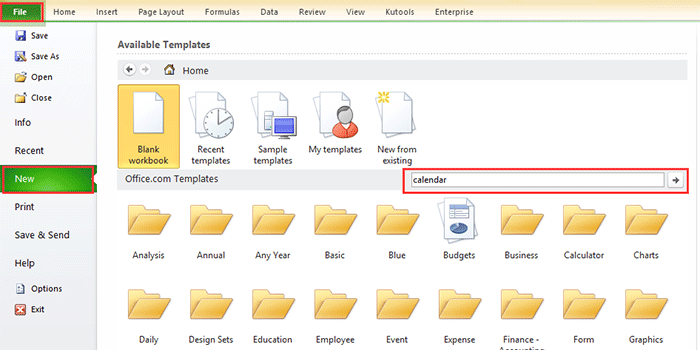
1. В Excel 2010/2013 щракнете върху досие > НОВ, в Excel 2007 щракнете върху Бутон за офис > НОВ, след това в десния раздел на изскачащия прозорец въведете календар в търсачката. Вижте екранна снимка:
В Excel 2010/2013
В Excel 2007

2. Натиснете Въведете, тогава в прозореца се показват няколко вида календари. Изберете един тип календар, от който се нуждаете, и щракнете Изтегляне (или създаване) в десния прозорец. Вижте екранна снимка:

Сега се създава календар в нова работна книга. Вижте екранна снимка:

Създайте месечен календар от VBA
Понякога трябва да създадете едномесечен календар за определен месец, като например януари 2015 г. Може да е доста трудно да се намери такъв шаблон на календар с горния метод. Тук представям VBA код, който да ви помогне да създадете конкретен месечен календар.
1. Натиснете Alt + F11 бутони за отваряне Microsoft Visual Basic за приложения прозорец, кликнете Поставете > Модули, след това копирайте и поставете под VBA кода в прозореца.
VBA: Създаване на месечен календар.
Sub CalendarMaker()

       ' Unprotect sheet if had previous calendar to prevent error.
       ActiveSheet.Protect DrawingObjects:=False, Contents:=False, _
          Scenarios:=False
       ' Prevent screen flashing while drawing calendar.
       Application.ScreenUpdating = False
       ' Set up error trapping.
       On Error GoTo MyErrorTrap
       ' Clear area a1:g14 including any previous calendar.
       Range("a1:g14").Clear
       ' Use InputBox to get desired month and year and set variable
       ' MyInput.
       MyInput = InputBox("Type in Month and year for Calendar ")
       ' Allow user to end macro with Cancel in InputBox.
       If MyInput = "" Then Exit Sub
       ' Get the date value of the beginning of inputted month.
       StartDay = DateValue(MyInput)
       ' Check if valid date but not the first of the month
       ' -- if so, reset StartDay to first day of month.
       If Day(StartDay) <> 1 Then
           StartDay = DateValue(Month(StartDay) & "/1/" & _
               Year(StartDay))
       End If
       ' Prepare cell for Month and Year as fully spelled out.
       Range("a1").NumberFormat = "mmmm yyyy"
       ' Center the Month and Year label across a1:g1 with appropriate
       ' size, height and bolding.
       With Range("a1:g1")
           .HorizontalAlignment = xlCenterAcrossSelection
           .VerticalAlignment = xlCenter
           .Font.Size = 18
           .Font.Bold = True
           .RowHeight = 35
       End With
       ' Prepare a2:g2 for day of week labels with centering, size,
       ' height and bolding.
       With Range("a2:g2")
           .ColumnWidth = 11
           .VerticalAlignment = xlCenter
           .HorizontalAlignment = xlCenter
           .VerticalAlignment = xlCenter
           .Orientation = xlHorizontal
           .Font.Size = 12
           .Font.Bold = True
           .RowHeight = 20
       End With
       ' Put days of week in a2:g2.
       Range("a2") = "Sunday"
       Range("b2") = "Monday"
       Range("c2") = "Tuesday"
       Range("d2") = "Wednesday"
       Range("e2") = "Thursday"
       Range("f2") = "Friday"
       Range("g2") = "Saturday"
       ' Prepare a3:g7 for dates with left/top alignment, size, height
       ' and bolding.
       With Range("a3:g8")
           .HorizontalAlignment = xlRight
           .VerticalAlignment = xlTop
           .Font.Size = 18
           .Font.Bold = True
           .RowHeight = 21
       End With
       ' Put inputted month and year fully spelling out into "a1".
       Range("a1").Value = Application.Text(MyInput, "mmmm yyyy")
       ' Set variable and get which day of the week the month starts.
       DayofWeek = WeekDay(StartDay)
       ' Set variables to identify the year and month as separate
       ' variables.
       CurYear = Year(StartDay)
       CurMonth = Month(StartDay)
       ' Set variable and calculate the first day of the next month.
       FinalDay = DateSerial(CurYear, CurMonth + 1, 1)
       ' Place a "1" in cell position of the first day of the chosen
       ' month based on DayofWeek.
       Select Case DayofWeek
           Case 1
               Range("a3").Value = 1
           Case 2
               Range("b3").Value = 1
           Case 3
               Range("c3").Value = 1
           Case 4
               Range("d3").Value = 1
           Case 5
               Range("e3").Value = 1
           Case 6
               Range("f3").Value = 1
           Case 7
               Range("g3").Value = 1
       End Select
       ' Loop through range a3:g8 incrementing each cell after the "1"
       ' cell.
       For Each cell In Range("a3:g8")
           RowCell = cell.Row
           ColCell = cell.Column
           ' Do if "1" is in first column.
           If cell.Column = 1 And cell.Row = 3 Then
           ' Do if current cell is not in 1st column.
           ElseIf cell.Column <> 1 Then
               If cell.Offset(0, -1).Value >= 1 Then
                   cell.Value = cell.Offset(0, -1).Value + 1
                   ' Stop when the last day of the month has been
                   ' entered.
                   If cell.Value > (FinalDay - StartDay) Then
                       cell.Value = ""
                       ' Exit loop when calendar has correct number of
                       ' days shown.
                       Exit For
                   End If
               End If
           ' Do only if current cell is not in Row 3 and is in Column 1.
           ElseIf cell.Row > 3 And cell.Column = 1 Then
               cell.Value = cell.Offset(-1, 6).Value + 1
               ' Stop when the last day of the month has been entered.
               If cell.Value > (FinalDay - StartDay) Then
                   cell.Value = ""
                   ' Exit loop when calendar has correct number of days
                   ' shown.
                   Exit For
               End If
           End If
       Next

       ' Create Entry cells, format them centered, wrap text, and border
       ' around days.
       For x = 0 To 5
           Range("A4").Offset(x * 2, 0).EntireRow.Insert
           With Range("A4:G4").Offset(x * 2, 0)
               .RowHeight = 65
               .HorizontalAlignment = xlCenter
               .VerticalAlignment = xlTop
               .WrapText = True
               .Font.Size = 10
               .Font.Bold = False
               ' Unlock these cells to be able to enter text later after
               ' sheet is protected.
               .Locked = False
           End With
           ' Put border around the block of dates.
           With Range("A3").Offset(x * 2, 0).Resize(2, _
           7).Borders(xlLeft)
               .Weight = xlThick
               .ColorIndex = xlAutomatic
           End With

           With Range("A3").Offset(x * 2, 0).Resize(2, _
           7).Borders(xlRight)
               .Weight = xlThick
               .ColorIndex = xlAutomatic
           End With
           Range("A3").Offset(x * 2, 0).Resize(2, 7).BorderAround _
              Weight:=xlThick, ColorIndex:=xlAutomatic
       Next
       If Range("A13").Value = "" Then Range("A13").Offset(0, 0) _
          .Resize(2, 8).EntireRow.Delete
       ' Turn off gridlines.
       ActiveWindow.DisplayGridlines = False
       ' Protect sheet to prevent overwriting the dates.
       ActiveSheet.Protect DrawingObjects:=True, Contents:=True, _
          Scenarios:=True

       ' Resize window to show all of calendar (may have to be adjusted
       ' for video configuration).
       ActiveWindow.WindowState = xlMaximized
       ActiveWindow.ScrollRow = 1

       ' Allow screen to redraw with calendar showing.
       Application.ScreenUpdating = True
       ' Prevent going to error trap unless error found by exiting Sub
       ' here.
       Exit Sub
   ' Error causes msgbox to indicate the problem, provides new input box,
   ' and resumes at the line that caused the error.
   MyErrorTrap:
       MsgBox "You may not have entered your Month and Year correctly." _
           & Chr(13) & "Spell the Month correctly" _
           & " (or use 3 letter abbreviation)" _
           & Chr(13) & "and 4 digits for the Year"
       MyInput = InputBox("Type in Month and year for Calendar")
       If MyInput = "" Then Exit Sub
       Resume
   End Sub
VBA идва от тази мрежа https://support.microsoft.com/en-us/kb/150774
2. Натиснете F5 или бягане и се появява диалогов прозорец, за да ви напомни да въведете конкретния месец, от който се нуждаете, за да създадете календар, вижте екранна снимка:

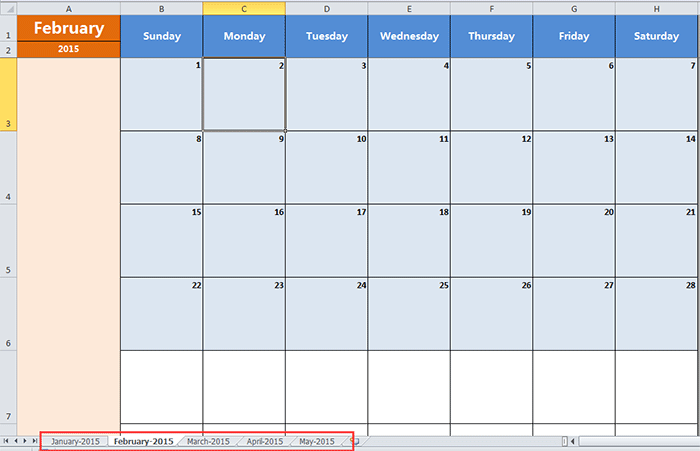
3. кликване OK. Сега в активния лист е създаден календар за януари 2015 г.

Но в горните методи има някои ограничения, например, ако искате да създадете календар от януари до май наведнъж, трябва да създадете календара пет пъти с горните два метода. Сега представям удобна помощна програма за бързо и лесно решаване на проблема
Създавайте лесно месечен или годишен календар чрез Perpetual Calendar
Вечен календар е една от мощните помощни програми в Kutools за Excelи може да ви помогне бързо да създадете месечен или годишен календар в Excel наведнъж.
| Kutools за Excel, с повече от 300 удобни функции, прави работата ви по-лесна. | ||
1. кликване Enterprise > Работен лист > Вечен календар. виж екранна снимка:

2. В изскачащия диалогов прозорец посочете продължителността на месеца, за който искате да създадете календара, и щракнете Създаване на. Вижте екранна снимка:

След това се създава нова работна книга с пет календарни работни листа. Вижте екранна снимка:
Съвет:
Ако просто искате да създадете конкретен месечен календар, просто трябва да изберете един и същи месец в текстовите полета От и До в диалоговия прозорец.
Щракнете тук, за да научите повече за Вечния календар
Най-добрите инструменти за продуктивност в офиса
Усъвършенствайте уменията си за Excel с Kutools за Excel и изпитайте ефективност, както никога досега. Kutools за Excel предлага над 300 разширени функции за повишаване на производителността и спестяване на време. Щракнете тук, за да получите функцията, от която се нуждаете най-много...
")
Раздел Office Внася интерфейс с раздели в Office и прави работата ви много по-лесна
- Разрешете редактиране и четене с раздели в Word, Excel, PowerPoint, Publisher, Access, Visio и Project.
- Отваряйте и създавайте множество документи в нови раздели на един и същ прозорец, а не в нови прозорци.
- Увеличава вашата производителност с 50% и намалява стотици кликвания на мишката за вас всеки ден!
")